The goal of this guide is to set up a Proxmox at a hoster who gives you only one public IP (V4 and / or V6) on a dedicated server.
The goal is that all virtual machines have Internet and that you can forward port to them.
How it’s working
The external network (VMBR0) has a public IPv4 and a public IPv6 available:
IPv4 network: 123.45.67.89/24
IPv6 network: 1234:5678:9abc:de::1/128Before starting, we need to create a private network.
In this guide, the internal network (VMBR1) will have IPv4 and IPv6:
IPv4 network: 10.0.0.1/24
IPv6 network: fde8:b429:841e:b651::1/64The communication will behave like this: VMBR0 <-> VMBR1 <-> Virtual machines.
The virtual machines will have address on the internal network (VMBR1), here is an example for a virtual machine:
iface ens18 inet static
        address 10.0.0.104/24
        gateway 10.0.0.1
        dns-nameservers 1.1.1.1 1.0.0.1


iface ens18 inet6 static
        address fde8:b429:841e:b651::104/64
        gateway fde8:b429:841e:b651::1
dns-nameservers 2606:4700:4700::1111 2606:4700:4700::1001The Proxmox will manage the NAT.
Configuring UFW
To protect Proxmox, we will install UFW (this is not mandatory, but do it anyway).
Install UFW:
apt install ufw -yOpen the default config file:
nano /etc/default/ufwConfigure the following options:
IPV6=yes
DEFAULT_FORWARD_POLICY="ACCEPT"Then open this configuration file:
nano /etc/ufw/sysctl.confAnd configure the following lines:
net/ipv4/ip_forward=1
net/ipv6/conf/default/forwarding=1
net/ipv6/conf/all/forwarding=1Disable the firewall:
ufw disableAllow all outside connections and deny all incoming connections:
ufw default deny incoming
ufw default allow outgoing
ufw allow in on vmbr1 to anyIf you have a fixed IP address at home, you can allow all connections from it:
ufw allow from 45.23.28.24If you don’t have fixed ip, allow all connections, but to selected ports to SSH and Proxmox:
ufw allow 22
ufw allow 8006Finally, enable the firewall:
ufw enableInternal Network setup (VMBR1)
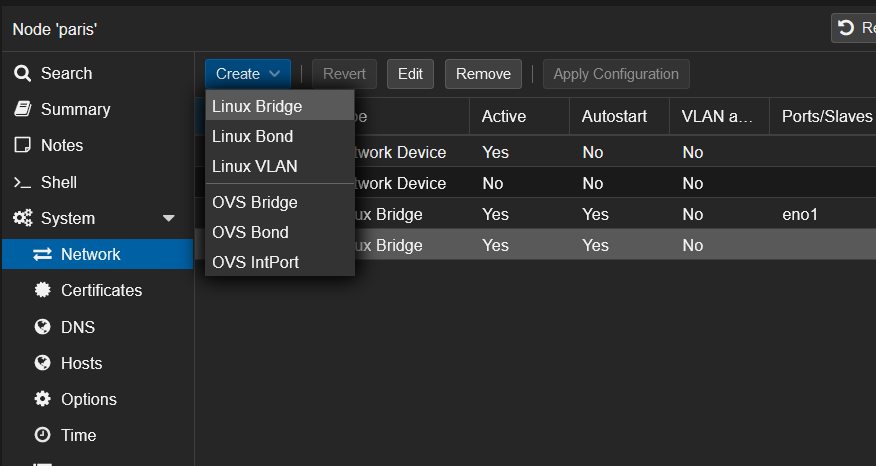
Open the Proxmox web interface and create the new interface from here (System -> Network -> Create -> Linux Bridge):
Configure the interface like this with the private networks we’ve seen before:
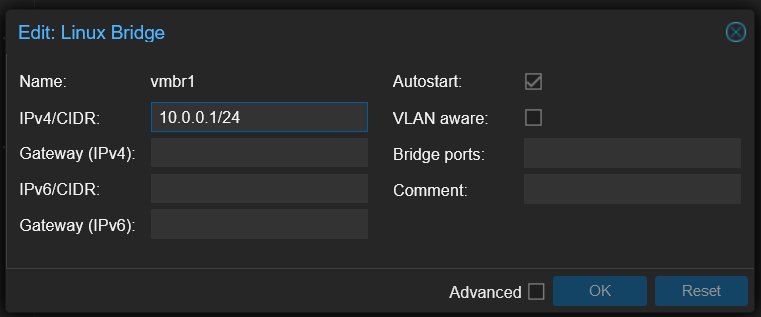
You will seen that I don’t put a Bridge port.
If you put a virtual machine or virtual switch on VMBR0 without additional IP, it is possible than your network port will be shutdown at the datacenter.
Routing configuration
We will configure MASQUERADE under Linux.
To be easy, MASQUERADE is a 1-to-many NAT type.
Behind that rude explanation is hidden the most common NAT type that you have behind your provider router and behind any firewall.
All the computers from the internal network can go to the Internet with only one public IP address.
Open your interfaces’ configuration:
nano /etc/network/interfacesAdd the following lines to VMBR1 in IPv4:
post-up echo 1 > /proc/sys/net/ipv4/ip_forward
post-up iptables -t nat -A POSTROUTING -s 10.0.0.0/24 -o vmbr0 -j MASQUERADE
post-down iptables -t nat -D POSTROUTING -s 10.0.0.0/24 -o vmbr0 -j MASQUERADEAdd the following lines to VMBR1 in IPv6:
post-up echo 1 > /proc/sys/net/ipv6/conf/all/forwarding
post-up ip6tables -t nat -A POSTROUTING -s fde8:b429:841e:b651::1/64 -o vmbr0 -j MASQUERADE
post-down ip6tables -t nat -D POSTROUTING -s fde8:b429:841e:b651::1/64 -o vmbr0 -j MASQUERADEIn a meaningful way, your full interface config should look just like this:
auto lo
iface lo inet loopback
iface eno1 inet manual
iface eno2 inet manual
auto vmbr0
iface vmbr0 inet static
address 123.45.67.89/24
gateway 123.45.67.90
bridge-ports eno1
bridge-stp off
bridge-fd 0
hwaddress 0C:C4:7A:47:DA:4C
iface vmbr0 inet6 static
address 2001:41d0:a:53d7::1/128
gateway 2001:41d0:000a:53ff:00ff:00ff:00ff:00ff
auto vmbr1
iface vmbr1 inet static
address 10.0.0.1/24
bridge-ports none
bridge-stp off
bridge-fd 0
post-up echo 1 > /proc/sys/net/ipv4/ip_forward
post-up iptables -t nat -A POSTROUTING -s 10.0.0.0/24 -o vmbr0 -j MASQUERADE
# post-up /root/dnat.sh
post-down iptables -t nat -D POSTROUTING -s 10.0.0.0/24 -o vmbr0 -j MASQUERADE
iface vmbr1 inet6 static
address fde8:b429:841e:b651::1/64
post-up echo 1 > /proc/sys/net/ipv6/conf/all/forwarding
post-up ip6tables -t nat -A POSTROUTING -s fde8:b429:841e:b651::1/64 -o vmbr0 -j MASQUERADE
post-down ip6tables -t nat -D POSTROUTING -s fde8:b429:841e:b651::1/64 -o vmbr0 -j MASQUERADENote: the -o vmbr0 is because my proxmox server’s external connection is on -o vmbr0 so if your main interface is, lets say eth0, use -o eth0 instead.
From here, restart your Proxmox and your virtual machines will have internet if you put fixed IP address on their network cards.
Fixed IP setup for virtual machines
Here, we will take the case of a virtual machine under Debian 11 with the virtual network card on the VMBR1 virtual switch:
# The loopback network interface
auto lo
iface lo inet loopback
# The primary network interface
allow-hotplug ens18
iface ens18 inet static
        address 10.0.0.104/24
        gateway 10.0.0.1
        dns-nameservers 1.1.1.1 1.0.0.1


iface ens18 inet6 static
        address fde8:b429:841e:b651::104/64
        gateway fde8:b429:841e:b651::1
dns-nameservers 2606:4700:4700::1111 2606:4700:4700::1001Port forwarding to virtual machines
Here we will create a script to open ports needed on the VMs.
The port 80 will be open in both IPv4 and IPv6 by redirecting to the IP .104.
Create this script for your configuration:
nano /root/dnat.shHere, open the port 80 on the virtual machine .104 in both IPv4 and IPv6:
sleep 60
iptables -t nat -A PREROUTING -i vmbr0 -p tcp --dport 80 -j DNAT --to-destination 10.0.0.104:80
ip6tables -t nat -A PREROUTING -i vmbr0 -p tcp -m tcp --dport 80 -j DNAT --to-destination [fde8:b429:841e:b651::104]:80iptables manage NAT rules in IPv4.
ip6tables manage NAT rules in IPv6.
Remember to chmod the file so it has execute permissions:
chmod +x /root/dnat.shBeware, if you configured UFW you also need to allow the port in the firewall:
ufw allow 80Then, you need to set up the script in the interfaces’ config file:
nano /etc/network/interfacesAdd the following lines to VMBR1 in IPv4:
post-up echo 1 > /proc/sys/net/ipv4/ip_forward
post-up iptables -t nat -A POSTROUTING -s 10.0.0.0/24 -o vmbr0 -j MASQUERADE
post-up /root/dnat.sh
post-down iptables -t nat -D POSTROUTING -s 10.0.0.0/24 -o vmbr0 -j MASQUERADELike this, the NAT will be applied at each restart.
Here is the file that I personally use:
sleep 60
# SSH
iptables -t nat -A PREROUTING -i vmbr0 -p tcp --dport 2201 -j DNAT --to-destination 10.0.0.101:22
iptables -t nat -A PREROUTING -i vmbr0 -p tcp --dport 2202 -j DNAT --to-destination 10.0.0.102:22
iptables -t nat -A PREROUTING -i vmbr0 -p tcp --dport 2203 -j DNAT --to-destination 10.0.0.103:22
iptables -t nat -A PREROUTING -i vmbr0 -p tcp --dport 2204 -j DNAT --to-destination 10.0.0.104:22
iptables -t nat -A PREROUTING -i vmbr0 -p tcp --dport 2205 -j DNAT --to-destination 10.0.0.105:22
iptables -t nat -A PREROUTING -i vmbr0 -p tcp --dport 2206 -j DNAT --to-destination 10.0.0.106:22
# Reverse proxy
iptables -t nat -A PREROUTING -i vmbr0 -p tcp --dport 80 -j DNAT --to-destination 10.0.0.104:80
iptables -t nat -A PREROUTING -i vmbr0 -p tcp --dport 81 -j DNAT --to-destination 10.0.0.104:81
iptables -t nat -A PREROUTING -i vmbr0 -p tcp --dport 443 -j DNAT --to-destination 10.0.0.104:443
ip6tables -t nat -A PREROUTING -i vmbr0 -p tcp -m tcp --dport 80 -j DNAT --to-destination [fde8:b429:841e:b651::104]:80
ip6tables -t nat -A PREROUTING -i vmbr0 -p tcp -m tcp --dport 81 -j DNAT --to-destination [fde8:b429:841e:b651::104]:81
ip6tables -t nat -A PREROUTING -i vmbr0 -p tcp -m tcp --dport 443 -j DNAT --to-destination [fde8:b429:841e:b651::104]:443
#VPN
iptables -t nat -A PREROUTING -i vmbr0 -p udp --dport 2194 -j DNAT --to-destination 10.0.0.103:2194
ip6tables -t nat -A PREROUTING -i vmbr0 -p udp -m udp --dport 2194 -j DNAT --to-destination [fde8:b429:841e:b651::103]:2194
# Portainer
iptables -t nat -A PREROUTING -i vmbr0 -p tcp --dport 9443 -j DNAT --to-destination 10.0.0.104:9443
ip6tables -t nat -A PREROUTING -i vmbr0 -p tcp -m tcp --dport 9443 -j DNAT --to-destination [fde8:b429:841e:b651::101]:9443The complete interface file looks like this:
auto lo
iface lo inet loopback
iface eno1 inet manual
iface eno2 inet manual
auto vmbr0
iface vmbr0 inet static
address 123.45.67.89/24
gateway 123.45.67.90
bridge-ports eno1
bridge-stp off
bridge-fd 0
hwaddress 0C:C4:7A:47:DA:4C
iface vmbr0 inet6 static
address 2001:41d0:a:53d7::1/128
gateway 2001:41d0:000a:53ff:00ff:00ff:00ff:00ff
auto vmbr1
iface vmbr1 inet static
address 10.0.0.1/24
bridge-ports none
bridge-stp off
bridge-fd 0
post-up echo 1 > /proc/sys/net/ipv4/ip_forward
post-up iptables -t nat -A POSTROUTING -s 10.0.0.0/24 -o vmbr0 -j MASQUERADE
post-up /root/dnat.sh
post-down iptables -t nat -D POSTROUTING -s 10.0.0.0/24 -o vmbr0 -j MASQUERADE
iface vmbr1 inet6 static
address fde8:b429:841e:b651::1/64
post-up echo 1 > /proc/sys/net/ipv6/conf/all/forwarding
post-up ip6tables -t nat -A POSTROUTING -s fde8:b429:841e:b651::1/64 -o vmbr0 -j MASQUERADE
post-down ip6tables -t nat -D POSTROUTING -s fde8:b429:841e:b651::1/64 -o vmbr0 -j MASQUERADEThis is a mirrored post with some modifications from Nicolas Simond. Original post:
https://wiki.abyssproject.net/en/proxmox/proxmox-with-one-public-ip